Your customer database
The Customers page is your customer database. You can add customers manually, import them from QuickBooks or a CSV/Excel file, or let a work order create a minimal contact for you on the spot. Each customer's page pulls together their contact info, service locations, jobs, invoices, payment methods, and notes in one place.
Add a customer
- 1Go to Customers and click Add Customer (top right).
- 2Fill in first and last name (required), phone, and email — both phone and email are required, since they power billing, texting, and the portal.
- 3Optionally add service locations right on the form with Add Service Location — each with an address, notes, and photos. When an address needs confirming, a picker shows Google's matching candidates on a map before saving.
- 4To bring in many customers at once, use Bulk Import (CSV, Excel, or even a screenshot of your old software) or Import from QuickBooks instead — see Import your customers.
Company name and display
The optional Company field pairs with a "Display as company instead of individual name" checkbox. Checked, the customer shows up everywhere under the company name (with the person's name kept underneath on their page) — right for HOAs, property managers, and commercial accounts.
Text message settings
- "Customer consents to receive SMS notifications" — checked by default, and the only text-related checkbox on the customer form. Covers service updates, appointment reminders, and technician arrival alerts. The same default applies to every other way a customer is added — the setup guide's quick-add, the mobile app's Create Customer screen, converting a lead, and CSV or QuickBooks import — so a customer only lacks consent if someone unchecked the box. See Texting and the Phone inbox.
- There is no longer a "Text when invoices are created" checkbox here. Which automated texts go out is a company-wide setting (Communication → Phone → Automated texts tab); a single customer's exception lives on their page as the Texts pill, below.
Email notifications, per address
The Email Notifications block lists the primary email with three checkboxes — Service Reports, Invoices, and Quotes (all on by default). Add Email adds extra addresses, each with its own three checkboxes, so a tenant can get service reports while the owner gets the invoices. New additional emails start with Service Reports on and Invoices/Quotes off. If several addresses are pasted into one email field (separated by commas), the first is kept in that field and the rest are saved as additional emails automatically — addresses split off the primary email get all three notification types turned on.
Notes and tags
Finish with free-form Customer Notes and Tags — a combobox where you can pick existing tags or type a new one to create it on the spot. Tags also show (and can be edited inline) on the customer's page, and the Customers table can filter by them.
Parent and child accounts
The Parent Account section at the bottom of the customer form links a customer to a parent — an HOA, property manager, or landlord. Once a parent is selected, Relationship Settings control where everything routes:
| Setting | Choices |
|---|---|
| Billing | Bill to Parent / Bill to This Account |
| Invoice Emails | Parent / This Account / Both |
| Service Reports | Parent / This Account / Both (defaults to This Account) |
| Quote Notifications | Parent / This Account / Both (defaults to Both) |
- On the parent's page, linked customers appear under Child Accounts — each row shows its location count, open invoices, and billing target — with an Add Child Account button that opens the customer form with the parent pre-linked.
- A child's page header shows a Parent pill linking to the parent, plus a one-line summary of the four routing choices.
- Billing routed to the parent can also be bundled into one invoice per period — see Consolidated billing.
Quick add contact — create a customer from a work order
You don't have to create a customer record before writing a work order for someone new. On the work order form, open the Service Location dropdown and choose Quick add contact (at the bottom of the list).
- Enter an email or phone number plus the service address — a name is optional — then click Create Contact.
- A minimal customer and service location are created automatically, so invoicing, emails, and routes all work normally.
- If the email or phone already matches an existing customer, that customer is reused instead of duplicated.
- Fill in the rest of their details later on the customer's page.
- Technicians have the same Quick Add Contact button in the customer picker when creating a work order in the mobile app.
The customer page, card by card
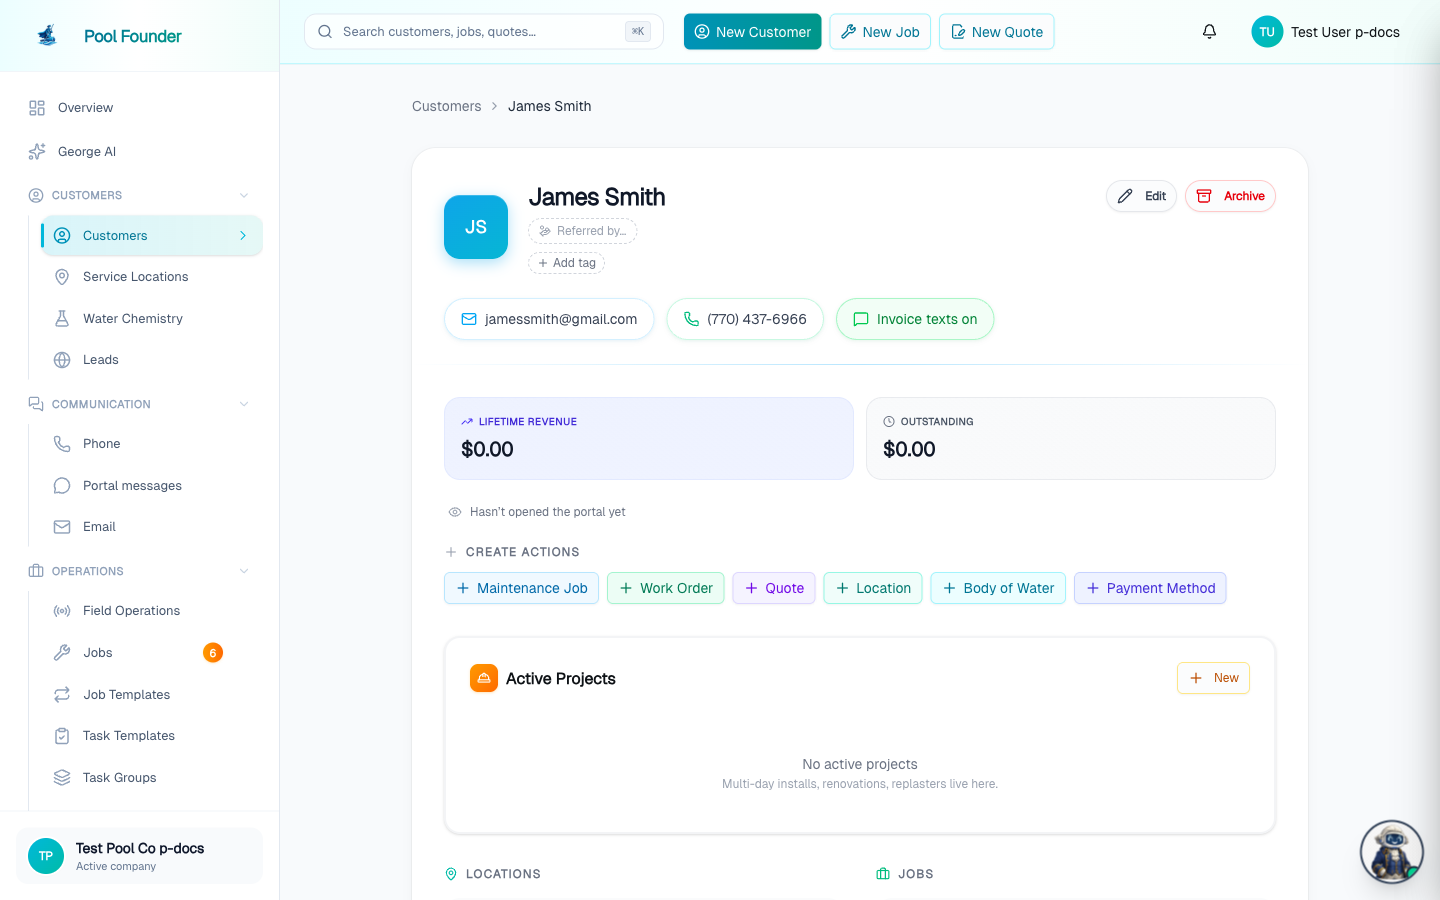
Open any customer to see one scrolling page with everything about them. The header shows the customer's name (or company), inline tags (add or remove them right there with the Add tag picker), and click-to-copy pills for their email addresses and phone number — one click copies the value to your clipboard. Two tiles summarize the money: Lifetime Revenue (all paid invoices) and Outstanding (open invoices, highlighted when above zero). Just below, a portal-activity line tells you whether they've opened their customer portal — how many times, and when last — or "Hasn't opened the portal yet".
The Texts pill
Next to the click-to-copy pills, a customer with a phone number gets a "Texts: Default" / "Texts: Off" / "Texts: Custom" pill. Click it to open Text preferences: their texting consent status (or the date they replied STOP), an Automated texts switch — off means this customer gets no automated texts at all — and a switch each for On the way, Invoice ready, Visit reminder, Service report ready, and Review request. Turning the Automated texts switch off also leaves this customer out of text broadcasts. There is no sixth switch here: the Lead follow-up automation texts leads rather than customers, and is paused per lead on the lead's own Follow-ups card. Reset to default puts the customer back on your company settings. Editing needs the update-customers permission. This replaced the old "Invoice texts on/off" pill.
- Create Actions — quick-create a Maintenance Job, Work Order, Quote, Location, Body of Water, or Payment Method for this customer.
- Technician Alerts — field reports and automatic visit alerts tied to this customer. See Technician Alerts.
- Child Accounts — customers linked to this one as their parent account.
- Locations — the customer's service addresses. See Service locations and pools.
- Jobs — their maintenance jobs and work orders.
- Service History and Service Photos — completed visits and the photos taken on them.
- Upcoming Schedule — what's coming up for this customer.
- Invoices — every invoice, each row with a link icon that copies that invoice's payment link.
- Communications — recent texts, portal messages, calls, and emails, with per-item links into the owning inbox and a "View all" that expands in place.
- Consolidated Billing — bundle this customer's opted-in maintenance jobs into one invoice per period. See Consolidated billing.
- Payment Methods — saved cards, bank accounts, and Stripe Link, with an AutoPay On pill and an AutoPay badge on the enrolled method. Buttons here enable, disable, or change the AutoPay method — see Accept online payments.
- QuickBooks — shown when QuickBooks is connected: a Synced / Not synced pill, the QuickBooks ID and last-synced time, an Open in QuickBooks button, and Sync now to push the customer plus their invoices, payments, and refunds on demand. See QuickBooks sync.
- Notes — free-form notes about the customer, with photos. These are internal: an Internal badge on the section (hover it for details) confirms they're visible to your office and to technicians in the field app, but never to customers — they don't appear on service reports, invoices, quotes, or the customer portal. Service location pages have the same notes section and badge. On a job's page, one Notes card brings them together: a switch at the top shows All, Job, Customer, or Location notes (plus Progress on work orders, the updates technicians leave when they mark the work in progress), and the Add note box adds to whichever one is selected, or to the job under All. Archived jobs show only the job's own notes, read-only. Notes can't be edited, but they can be deleted: roles with the Delete notes permission (Owners, Administrators, and Office Managers by default, not Technicians) see a trash icon on each note, on the customer, location, and job pages and in the mobile app. Confirm Delete and the note and its photos are removed for everyone; there's no undo. Work order progress updates and the "From job setup" note can't be deleted. The note a customer can see is the technician's visit note on a service report.
- Customer Profitability — once the customer has revenue, a card at the bottom shows revenue, costs, profit, and margin, with a link to the full breakdown. See Profitability analytics.
The Edit button opens the customer form for contact info. Service addresses are not edited there — they're separate service-location records. Add one with the Location quick-create and edit them under the Locations section.
If you run your own customer referral program, the profile header also has a Referred by… pill to record which existing customer referred this one (requires the update-customers permission). See Referral programs.
Billing address (when invoices go somewhere else)
Most customers are billed at the pool, so the customer record has no address of its own — the service location is the address. When invoices should be addressed somewhere else (an out-of-state owner, a property manager, a PO box), give the customer a billing address. It lives on the customer, not on a service location, and is never placed on a map.
- 1Open the customer's page and find the Billing address section. Until one is set it reads Same as service address.
- 2Click Edit, fill in the street, city, state, and ZIP (a PO box is fine — there is no map pin to confirm), and click Save.
- 3To go back to billing at the pool, click Edit and then Use service address.
- 4You can also set it while adding or editing a customer: the customer form has a Billing address (optional) section with an Add Billing Address button.
For now the billing address is stored for reference and sent to QuickBooks as the customer's Bill to address on the next sync. It does not yet print on invoice PDFs, the payment page, or the customer portal, and it is not sent to Stripe — those still show the customer's name and email only. A spreadsheet import with a Billing Address column lands it here too, rather than creating a service location.
Look up a customer on the technician app
The mobile customer directory is gated on the Browse customer directory permission (`customers:list`). Owners, administrators, office managers, bookkeepers, and viewers have it by default; the built-in technician role does not. People with the permission see Customers in the Actions list at the bottom of the Route tab (the Route tab's actions sheet, under the Customers heading). Technicians still see contact info on the job they're servicing, and they can still pick a customer when creating a work order or quote, but they cannot open a searchable company directory. To give a custom field role the list, add this permission on Roles. The list also works offline: the app keeps a saved copy of every customer's name, phone number, and service addresses on the phone, so you can look someone up, call them, and navigate to their address with no signal. Opening a customer offline shows that saved info (plus anything viewed before); parent/child accounts, invoices, and photos load when you're back online.
- The search box at the top matches name, company, email, phone, notes, or service location address — the same search as the web Customers table.
- Tap a row to open that customer. The page shows the same information as the web customer page that your role is allowed to see: contact (tap to call, text, or email), tags, notes, locations, jobs, service history and photos, upcoming schedule. Invoices, lifetime revenue, outstanding balance, saved payment methods, and job/visit prices only appear if you have the view-invoices permission — a technician role never sees them.
- Technician Alerts, child accounts, and active projects appear when they exist and you have permission to view them. Project contract amounts are hidden without the view-invoices permission.
- The pencil in the header edits the customer (needs the update-customers permission). Create chips at the top start a maintenance job, work order, quote, invoice, location, or body of water for this customer when you have those permissions.
- Creating or editing a customer on mobile exposes the same Email Notifications controls described above — the per-category toggles on the primary email, plus per-address toggles when you tap Add Email — so you can route which messages each address receives right from the phone.
- From a job's detail screen, tap the customer name to open the same page (same office-only gate).
- Adding a brand-new card, archiving a customer, and profitability are not on mobile — use the web dashboard for those.
Find customers in the table
- The search box matches name, company, email, phone, notes, or service location address — so "gate code 4411" or a street name finds the customer too.
- The Filter by tags combobox narrows the list to customers carrying every selected tag.
- Texting status (next to the tag filter) — show one texting bucket only, such as No consent on file; the Who's reachable tiles on Automated texts open it for you.
- The Show Archived checkbox switches the table to archived customers, each with an Unarchive button.
- Click any address in the Service Locations column to preview it on a map in a modal — without leaving the table. Customers with no location yet show an Add Location button instead.
- The table loads more rows as you scroll; each row also has an inline Archive action.
- Each row has a checkbox (the header checkbox selects every loaded row). Selecting rows shows a floating bar with the count and an Archive Selected button for archiving in bulk — handy after a QuickBooks or CSV import brings in customers you no longer service. With 2 to 10 rows selected, the bar also has Merge Selected for combining duplicates; see Merge duplicate customers.
Ask a customer to save a card by email
You never need to collect card numbers over the phone. The Add Payment Method dialog (from the Create Actions card, the Payment Methods section, or the Add card button on a maintenance job's AutoPay row) has two tabs: Enter card — type the card in yourself — and Email customer, which sends a secure link where the customer enters their own card.
- The link expires in 7 days and can only be used once. Only the primary contact is emailed — additional emails on file don't receive it.
- The dialog shows the last request's status: when it was sent, and whether the customer saved a card, the link expired, or it's still active.
- When a customer has no payment methods yet, the empty Payment Methods section offers the same thing as a one-click Email customer to save a card button (then Resend card request). Requests are rate-limited to one per hour.
- When entering a card yourself, an "Enable AutoPay with this card" checkbox enrolls it for automatic invoice payment in the same step. See Accept online payments.
Call a customer from your browser
A Call button appears next to the customer's phone number for users with the "Call customers from the web app" permission, once your company has a business number. It places a real call from the browser in a small dialog with mute and a duration timer. The customer's caller ID shows your business number — in call-forwarding mode, the dialog notes that their caller ID shows the assistant's private line, not your published number. See Phone setup.
Calls your team places from the web are logged as outgoing in the Phone inbox with no transcript — only assistant-answered calls are transcribed. Web calling is rate-limited to prevent abuse.
Archiving — and what about deleting?
Customers — like jobs and routes — are archived, not permanently deleted. Archiving hides the record but keeps all of its history. Before anything happens, the archive dialog shows exactly what the archive will touch:
- A summary of what will be archived with it: their service locations, maintenance jobs, and work orders, plus any pending quotes (which are cancelled).
- A warning listing how many jobs will be removed from routes, naming each affected route.
- A notice that AutoPay will be disabled if the customer has it on.
- A reminder of what is preserved: completed service records, paid invoices, and payment history all stay accessible for reporting and accounting.
A customer with unpaid invoices can't be archived — the dialog blocks with the count and total owed, and links straight to their unpaid invoices so you can resolve them first.
To confirm, you type the customer's name exactly, then click Archive Customer. Archived customers keep a Restore button on their page (and an Unarchive button in the table's archived view).
To archive many customers at once, select them with the checkboxes in the customers table and click Archive Selected in the floating bar. One dialog previews the combined impact — no name typing per customer. Customers with unpaid invoices are skipped automatically (the dialog lists who and why) while the rest are archived.
There is no permanent-delete option in the dashboard. If you need a customer permanently deleted, contact support at support@poolfounder.com.
Frequently asked questions
How do I change a customer's address?
Service addresses live on service locations, not on the customer form: open the customer's page and edit the address under the Locations section. The one address that does live on the customer is the optional billing address — the Billing address section on the customer page (Edit → Save, or Use service address to clear it). It is stored for reference and sent to QuickBooks; it is not printed on invoices yet.
Can a customer have a billing address that is different from the pool address?
Yes. Every customer page has a Billing address section that reads Same as service address until you set one. Click Edit, type the mailing address (a PO box is fine, no map pin needed), and Save. Use service address clears it. QuickBooks receives it as the customer's Bill to address on the next sync. It does not yet print on invoice PDFs, the payment page, or the customer portal, and it is not sent to Stripe.
Why can't I archive a customer?
They have unpaid invoices. The archive dialog blocks with the count and total owed and links to the open invoices — collect, void, or write them off first, then archive.
Can I archive several customers at once?
Yes. In the customers table, select rows with the checkboxes (the header checkbox selects all loaded rows), then click Archive Selected in the floating bar. One confirmation covers the whole batch — customers with unpaid invoices are skipped automatically and listed with the reason.
How do I delete a note?
Click the trash icon on the note, then confirm <strong>Delete</strong>. It works on customer, service location, and job notes, on the web and in the mobile app, and removes the note and its photos for everyone with no undo. You need the <strong>Delete notes</strong> permission: Owners, Administrators, and Office Managers have it by default, and the built-in Technician role does not, so technicians can't delete notes. Notes can't be edited, so to fix one, delete it and add a new note (for example, move a gate code into the service location's Location Notes).
Can I permanently delete a customer?
Not from the dashboard — customers are archived, which hides them but keeps their history. For permanent deletion, contact support at support@poolfounder.com.
Can I create a work order for someone who isn't a customer yet?
Yes. Use "Quick add contact" in the work order form's Service Location dropdown — an email or phone number plus the service address is enough (name optional). A minimal customer and location are created automatically, and you can fill in the details later.
How do I look up a customer on the technician app?
On the Route tab, scroll to Actions and tap Customers. That row needs the Browse customer directory permission (owners, admins, and office roles have it; built-in technicians do not) and an internet connection. Search by name, phone, or address, then tap a row. Technicians still see the customer on the job they're running, and can still pick a customer when creating a work order. Invoice totals and job prices stay hidden unless the viewer has the view-invoices permission.