How customers pay you
Connect Stripe and your customers can pay by card, debit card, or ACH bank transfer from an emailed secure payment link — or automatically via autopay with a saved payment method. Without Stripe you can still invoice; customers pay by Zelle, check, or cash, and your team records the payment.
Connecting Stripe, saving a customer's card, sending a card-on-file request, and charging a card all require a verified phone number or email on the account — see verify your phone or email. Recording an offline payment by hand does not.
Requirements before you connect
- An active paid subscription. Connecting Stripe is not available during the free trial — trial companies see "Accepting payments comes with a plan" and a "Choose a plan" button on the Billing page. This is a fraud-prevention rule: Pool Founder carries the dispute liability on connected accounts. Everything else you build during the trial (customers, routes, jobs, invoices) is saved — you just can't turn on live card processing until you pick a plan. Companies that already finished Stripe onboarding keep their access.
- Owner or Administrator. Connecting needs the "Connect the company Stripe account" permission, which only Owners and Administrators have by default. Anyone else sees "Only an owner can connect payments" in place of the connect buttons — an Office Manager or Bookkeeper cannot connect Stripe.
Connect Stripe
- 1Open the Billing page.
- 2Choose Create New Account (a guided 5-minute Stripe Express setup — recommended) or Connect Existing Account (sign in to an existing Stripe account via OAuth).
The Billing page once connected
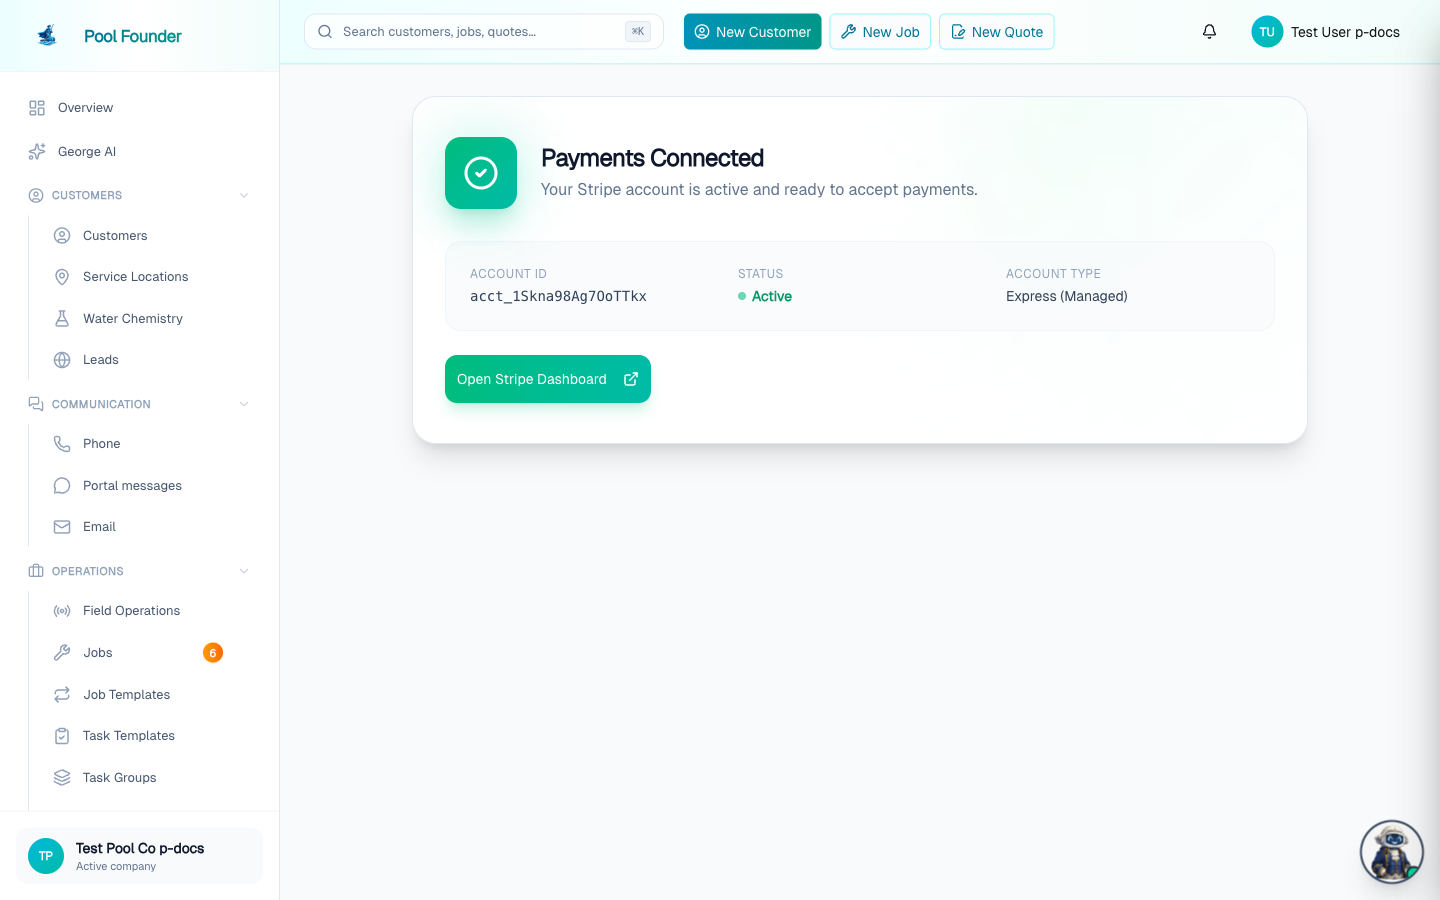
After onboarding finishes, the Billing page switches to a "Payments Connected" state showing your account details:
- Account ID — your Stripe account identifier (handy when contacting Stripe support).
- Status — shows Active when the account is ready to accept payments.
- Account Type — Express (managed) if you created a new account, or Standard (existing) if you linked one you already had.
- Open Stripe Dashboard — opens your Stripe dashboard in a new tab to see individual charges and disputes.
- Deposits — every Stripe deposit to your bank, expandable into a customer-by-customer breakdown with fees itemized and a CSV export. See reconcile bank deposits.
Card processing fees: an opt-in, per-invoice choice
Stripe charges 2.9% + $0.30 per card transaction. That fee is not automatically passed to your customers — by default your company absorbs it. To have a customer cover it, turn on the "Pass Processing Fees to Customer" toggle when creating the invoice. Job templates carry a matching default ("Pass credit card fees to customer"), which pre-fills the toggle on invoices created from those jobs.
- The fee only ever applies to credit cards. Debit cards, prepaid cards, and ACH bank transfers are never surcharged — if the customer pays with one of those, the fee is waived automatically even when the toggle is on.
- How much the customer pays: the fee covers Stripe's 2.9% + $0.30 but is capped at 3% of the invoice, the card-network limit. On most everyday invoices the cap applies, so a $150 invoice carries a $4.50 fee and your company absorbs the few cents the cap leaves uncovered. Tips are never surcharged.
- On the customer's pay page, a "Credit card fee (est.)" line shows the fee as a dollar amount, with the note "Only applies to credit cards. Pay with a debit card or by bank transfer (ACH) below to avoid this fee." A banner above the payment form repeats the same amount: "Debit cards and bank transfers (ACH) are always fee-free. Credit cards add a $4.50 processing fee." The pay page never shows the fee as a percentage.
- Some states don't allow the fee — the fee is never added for service locations in California, Connecticut, Massachusetts, Maine, New York, or Puerto Rico. The toggle is disabled automatically with an explanation, no fee is charged, and the pay page shows no card fee line. (New York requires the credit card price, fee included, to be shown up front, which a fee added at checkout can't do.) As the toggle notes: "State restrictions are automatically enforced based on the service location."
- Colorado and Oklahoma cap the fee at 2% — the fee is allowed there, but it never exceeds 2% of the invoice (a $150 invoice carries $3.00 instead of $4.50). Pool Founder applies the cap automatically.
- When the toggle is off (or the fee is waived), your company absorbs Stripe's processing fee — the customer just pays the invoice total.
You never have to police state surcharge laws yourself — Pool Founder disables the option and waives the fee automatically based on where the service location is.
Autopay
Autopay charges the customer's saved payment method automatically when invoices are issued. Customers can turn it on themselves while paying an invoice: on the pay page, checking "Save this card and automatically pay future invoices" both saves the card and enrolls it for autopay — one combined checkbox. Autopay can also be managed from the customer portal and from the customer's page on your dashboard.
- From the customer's page, Enable AutoPay opens a dialog explaining how it works and, when the customer has more than one saved method, lets you pick which one to charge.
- Disabling autopay keeps the payment method on file — the dialog states the saved method "will remain on file and can be re-enabled for AutoPay at any time." The customer just goes back to paying each invoice via the payment link.
- A Change AutoPay Payment Method dialog switches which saved method autopay charges; the active one shows an "AutoPay" badge in the saved-methods list.
Saved payment methods in the customer portal
On the Billing page of the customer portal, customers manage their own payment methods and autopay:
- Multiple saved methods. "Add Payment Method" accepts a credit card or a bank account (ACH) — customers can add a bank account directly, not just while paying an invoice. Each saved method lists its brand, last four digits, and expiration.
- Per-method autopay choice. While autopay is on, the enrolled method shows an AutoPay badge and every other method shows a "Use for AutoPay" button — one click switches which method autopay charges. When adding a new method, a "Use this for AutoPay" checkbox enrolls it immediately.
- Charge specific jobs to a different card. Customers with autopay on, more than one saved method, and more than one maintenance job see a "Charge specific jobs to a different card" section — each job has a dropdown defaulting to "AutoPay card (default)", with any saved method selectable per job. You have the same control on the job's page in your dashboard: the AutoPay row in the job card's Invoicing group opens the "AutoPay card" dialog, defaulting to "Use customer default". With no card on file the row shows an Add card button instead, and the dialog has Add a new card; both open the same Add Payment Method dialog (Enter card or Email customer).
- Removing a method asks for confirmation — and if it was the autopay method, the customer is prompted to pick a new one.
Request a card on file by email
You don't have to read card numbers over the phone. From a customer's page, open Add Payment Method and switch to the Email customer tab (the other tab, Enter card, is for typing a card in directly):
- The customer is emailed a secure link that expires in 7 days and can only be used once. Only the primary contact is emailed — additional contacts on file don't receive it.
- The tab shows the latest request's status: when it was last sent, to whom, and whether the customer saved a card, the link expired without use, or the link is still active. The button reads Send email (or Resend email while a request is outstanding).
- When a customer has no payment methods yet, their page shows an "Email customer to save a card" button right on the empty state (then "Resend card request" with the same status line).
- The link opens a page branded with your logo and colors — "Save a card on file" — where the customer enters their card and clicks Save card on file for [your company]. An expired link shows "Link expired" with a prompt to ask you for a new one, and a used link shows "Card saved".
The save-card page tells the customer "A processing fee may be added to invoices paid by credit card. Debit cards and bank payments never have a fee." — the fee itself still only applies when you turn on the pass-fees toggle for an invoice.
ACH bank payments: verification and processing
ACH is always fee-free, but it is not instant. What happens after a customer chooses "US bank account" on the pay page depends on how they connect the account:
- Instant bank login: the payment starts right away and the customer sees "Payment processing" — ACH takes up to 5 business days to clear at the bank. The invoice stays Open until it settles, then flips to Paid automatically and the customer gets a receipt.
- Manually typed account numbers: the bank has to be verified first with a micro-deposit. The customer sees "One more step to finish paying" — in 1–2 business days a small deposit (a few cents) with a short code arrives in their account, and they enter the code via the "Verify your bank" link (also emailed to them). No money is collected until they verify.
- Customers who don't want to wait can click "Cancel and pay a different way" on that screen — the pending bank payment is canceled and the pay form comes back so they can use a card instead.
What your team sees
- An invoice with a pending verification shows a "Bank payment awaiting verification" banner (and an "Awaiting verification" badge) — no funds have been collected yet. The banner includes an "Open bank verification page" link and a "Cancel bank payment" button, so staff can also free a stuck customer to pay another way.
- An in-flight payment shows a "Bank payment (ACH) processing" banner (and a "Payment processing" badge) — the payment is clearing and the invoice will flip to Paid on its own.
- While an ACH payment is processing, the invoice's amount is locked — Edit, Void, and Take payment are hidden until it settles, so the total can't change out from under an in-flight charge.
Service Terms on the pay page
Job templates have a Service Terms field. When a job's template carries terms, they are saved onto each invoice at creation and shown on the pay page in a collapsible "Service Terms" section. The customer must check "I agree to the Service Terms." before the Pay button enables — until then it stays disabled with the note "Please agree to the Service Terms above to continue." Invoices whose terms were already accepted (and invoices with no terms) skip the checkbox.
Terms are snapshotted per invoice — editing a template's Service Terms only affects new invoices, not ones already sent.
Invoicing before Stripe is connected
- 1The Invoices page always opens and lists every invoice, connected or not — it does not redirect you to Billing.
- 2A banner at the top names the missing step: "You can build jobs now, but you can't bill for them yet" (if you still need a plan) or "Connect Stripe to bill these jobs" (if you have a plan but haven't connected).
- 3Create Invoice works normally. In place of the payment-method picker, the form says "Sent for offline payment" — the customer pays by Zelle, check, or cash.
- 4When the money arrives, record it: open the invoice → Take payment → Record a manual payment.
The customer's pay page adapts to what you have turned on: a card/ACH form when Stripe is connected, the Zelle QR code when Pay by Zelle is on, and otherwise your company phone and email under "How to pay".
Offline methods are display only — the app never learns the money arrived, so someone on your team has to record the payment on the invoice. See record and void manual payments.
Turn on Pay by Zelle
Pay by Zelle is opt-in and off by default. When on, a Zelle QR code and "Pay with Zelle" link appear on invoices (the email and the online pay page), post-visit service report emails, and the customer portal — each surface toggleable independently. Zelle settles bank-to-bank outside Stripe with no card fee.
- 1Open Invoice Settings and find the Pay by Zelle section.
- 2Toggle Accept Zelle payments on, then enter your Zelle email or phone — the address enrolled with Zelle at your bank — and, optionally, a Recipient name (defaults to your company name).
- 3The app generates the QR code automatically — there is no image to upload. A preview appears; scan it with your banking app to confirm it resolves to your handle.
- 4Use the Show on invoices, Show on service reports, and Show in customer portal toggles to choose where customers see it.
Zelle is display only — the app does not track Zelle payments. When one arrives, record it as a manual payment on the invoice (Invoices → open the invoice → "Take payment" → "Record a manual payment"), the same as a check.
Tipping
Customers can optionally tip your technicians in three places: preset tip buttons on the invoice pay page, the customer portal, and a tip link in service report emails — each surface is opt-in and off by default. Tips ride on the same card charge and are never surcharged, and every tip lands on the Tips page grouped by technician. See tips and gratuities for the full setup and payout workflow.
Frequently asked questions
Do my customers always pay the credit card fee?
No — the fee is opt-in per invoice. Turn on "Pass Processing Fees to Customer" when creating an invoice (job templates can set the default). Even then it only applies to credit cards: debit cards, prepaid cards, and ACH are never surcharged, and the toggle is disabled automatically for service locations in states where the fee isn't allowed (CA, CT, MA, ME, NY, PR). In Colorado and Oklahoma the fee is capped at 2%.
How much is the credit card fee my customers pay?
It covers Stripe's 2.9% + $0.30 processing cost but is capped at 3% of the invoice (2% in Colorado and Oklahoma), so a $150 invoice carries a $4.50 fee, or $3.00 in Colorado and Oklahoma. It is not a flat 2.9% + $0.30. Customers see the fee as a dollar amount on the pay page, never as a percentage. Debit cards, prepaid cards, and ACH are never surcharged, and no fee is added at all for service locations in CA, CT, MA, ME, NY, or PR.
Can I pass credit card fees to customers in New York?
No. The card fee is never added for service locations in New York. New York law (General Business Law §518) requires the credit card price, fee included, to be shown up front, and a fee added at checkout doesn't meet that, so Pool Founder turns the option off there automatically, the same as California, Connecticut, Massachusetts, Maine, and Puerto Rico. Customers in those states pay the invoice total with any card. Colorado and Oklahoma do allow the fee, capped at 2% of the invoice.
How do I get a customer's card on file without taking it over the phone?
Open Add Payment Method on the customer's page and use the "Email customer" tab — the customer gets a secure, single-use link (valid 7 days) to a branded page where they enter the card themselves. If they have no methods on file yet, the "Email customer to save a card" button is right on their page.
How long does an ACH bank payment take?
Up to 5 business days to clear once it starts — the invoice stays Open and flips to Paid automatically. If the customer typed in their account numbers manually, they first verify the account with a micro-deposit code (1–2 business days); no money is collected until they verify, and either they or your staff can cancel the pending bank payment so they can pay by card instead.
Can my office manager connect Stripe for me?
No. Connecting Stripe requires the "Connect the company Stripe account" permission, which only Owners and Administrators have by default.
Why can't I connect Stripe during my trial?
It's a fraud-prevention rule — Pool Founder carries the dispute liability on connected accounts, so live card processing requires an active paid subscription. Everything else you set up during the trial is saved; pick a plan and come back to connect.
Does Pool Founder know when a Zelle payment comes in?
No — Zelle settles bank-to-bank outside the app and is display only. Record it as a manual payment on the invoice when it arrives.