Routes in Pool Founder
A route is a technician's schedule of jobs for a specific day of the week. You build routes in two places: the Route Builder, a drag-and-drop board for assigning many jobs across days and technicians at once, and the Route Schedule, where individual routes are created and managed day by day.
Route optimization is based on location and drive time, and jobs can be scheduled anywhere from weekly to annually — including multiple visits per week for pools that need them.
The Route Builder
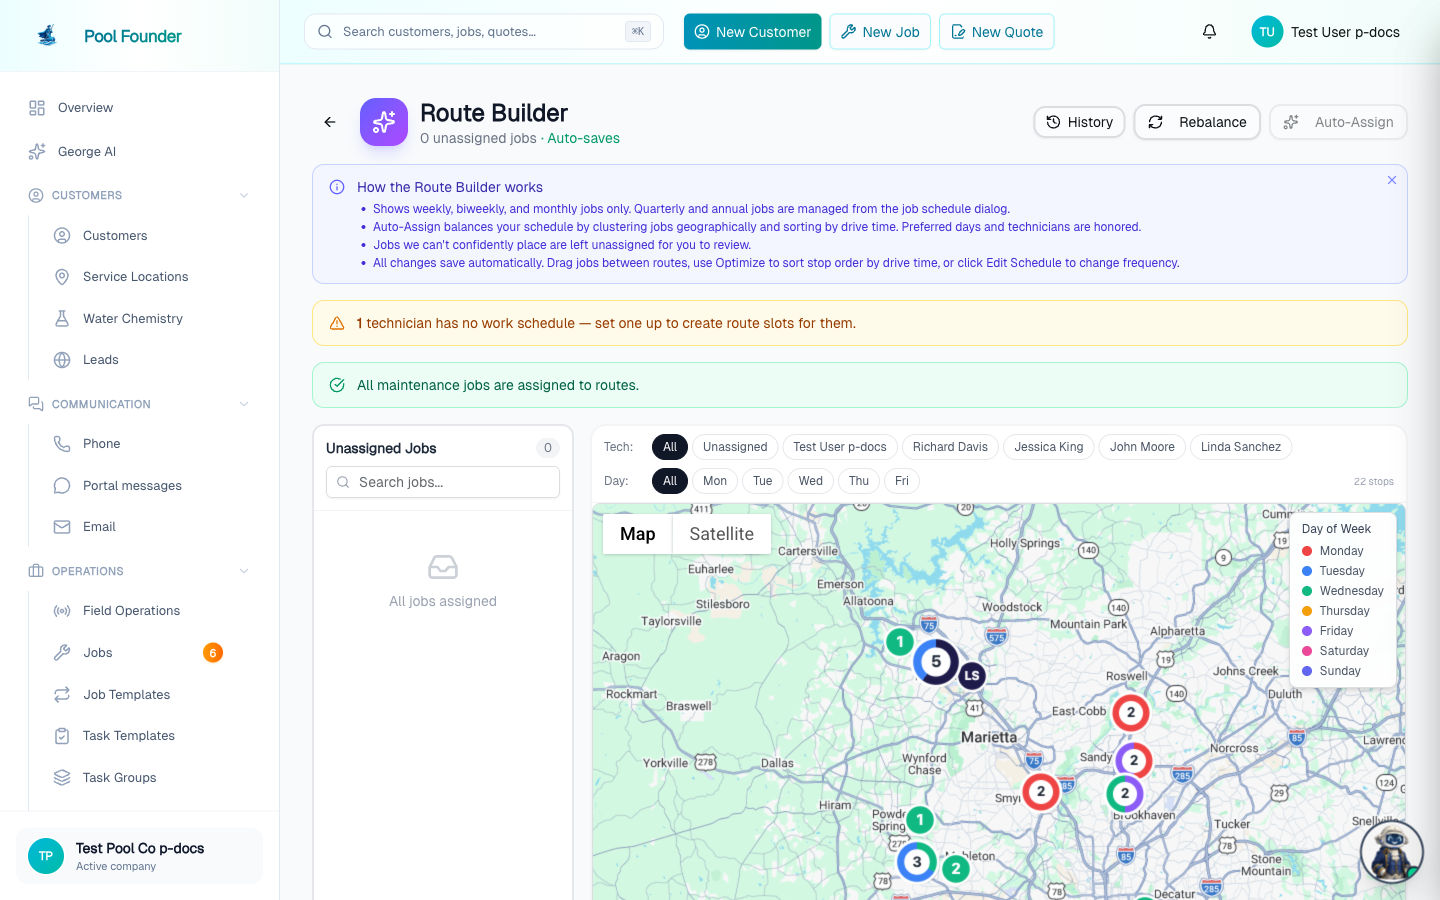
- 1Open the Route Builder. The board is a left panel with two tabs — Unassigned and Routes — and a map filling the rest of the screen. On a phone or a narrow window there is no room for both side by side, so a Board / Map switch appears under the header and each one takes the full screen; the builder remembers which you were last on.
- 2Drag a job from the Unassigned tab onto a day slot — the panel flips to the Routes tab automatically while you drag, then flips back when you drop — or click Auto-Assign to place everything at once.
- 3Don't want to pick the exact spot? While you drag, every technician name and every day header turns into a Best fit target. Drop on a day header and the stop slides into the cheapest position in that day; drop on a technician's name and the builder picks the day and the position for you — preferred days win first, then the day that adds the least driving, and days that would run past the technician's workday are pushed down the list. The drag label previews the result, for example Best fit: Thu · after Smith.
- 4Made a mistake? Every assign, move, and removal raises a toast naming what changed, with an Undo button. Undo is one level deep — it always reverses the most recent change.
- 5To take a stop back off a route, drag it onto the Drop here to remove from route strip at the bottom of the panel (or onto the Unassigned tab), or click the × on the card.
- 6To send a stop that is already on a route to a different technician or day without dragging, click Move on its card in the Routes tab (or Move… on its pin on the map). The same technician + day picker opens, with the slot it is leaving greyed out. This moves the one stop; it doesn't change the job's schedule.
- 7To place several stops at once, tick the checkboxes on the unassigned cards (hold Shift to select a range, or use Select all visible), then click Assign N jobs… and pick one technician + day.
- 8Use Rebalance to redistribute jobs across your existing routes.
- 9Auto-Assign and Rebalance both stop at a preview before anything is saved. Review it, then click Apply to commit or Cancel to walk away with nothing changed.
- 10Each day slot has an Optimize button that orders that day's stops with Google Maps, and Optimize All in the header runs every route that needs it in one go. On a narrow screen the header keeps Auto-Assign and moves History, Rebalance, and Optimize All into the ⋯ menu beside it.
Just finished creating jobs in bulk? Route Builder → Auto-Assign is the fastest way to get them all onto routes. See Add Service in Bulk for the full setup flow.
- A day slot that has never been optimized shows a blue Optimize button. Once it runs, the button turns green and reads Optimized — you can still click it to run optimization again at any time.
- When you add, remove, move, or hand-reorder a stop on an optimized route, the slot flips to an amber Changed since optimized strip and a Re-optimize button, so it's obvious which routes are running an out-of-date stop order.
- Optimize All runs every route with 2 or more stops that is either not optimized yet or has changed since — routes already carrying a fresh optimization are skipped. The button shows how many routes it would run, and a progress dialog counts them off.
- The map fills the rest of the board and plots assigned stops color-coded by day and unassigned stops as gray pins. Filter chips above it narrow the map by technician or day — on a narrow screen the chips become two dropdowns, tech and day, in a single row. Lasso drawing is not available on small screens — tap a gray pin and choose Add to selection instead. The gray unassigned pins stay visible when you filter to a single day, so you can see what is still loose near that day's cluster.
- When you click Assign on a card (or bulk-assign a selection, or click Move on a stop already on a route), the picker opens with a Best fit section at the top — the two or three best technician + day options. They are ranked by the job's preferences first (options matching the preferred day and preferred technician always come before options matching only one, then none), then by the least added driving — and a day that would run past the technician's workday counts every extra minute against it, so overloaded days fall down the list instead of winning on distance alone. Each option shows the stops that day would go from and to, its estimated time and miles, the extra driving it would add (for example +0.8 mi drive), and a short reason such as Preferred day + tech, Preferred day, Preferred tech, Least added drive, or Lightest day. Click one to select it.
- Below Best fit is a grid: one row per technician, one column per weekday anybody works. Each square shows the stop count that day would end up with and a bar showing how full the technician's workday would be — the bar turns red at the end when the route would run past their end time, and a dash means the technician doesn't work that day. Squares that would double-book a multi-visit job on the same day are greyed out, and in Move mode the slot the stop is leaving is greyed out too. A star marks one of the job's preferred days. Routes with no technician are listed in their own Unassigned routes group at the bottom.
- Whichever option you pick, a line above the buttons spells out the result — stops before → after, estimated time against the length of that workday, estimated miles, and (when moving) the technician and day the stop is leaving. Times and miles are always the estimate after the assignment.
Auto-Assign and Rebalance never write straight to your routes. Both build a proposal first and hand it to you as a preview:
- The map switches to the proposed routes — dashed lines in each day's colour, home base → stops → home base — and the pins that would move are recoloured to their proposed day and renumbered to their proposed stop order, ringed with a dashed halo so a proposal never reads as something already saved.
- A panel over the map lists every technician + day the run would touch, each with stops before → after, the change (+3, -5), and the estimated time and miles that day would run.
- On a Rebalance preview each row also shows how many stops are new here — arriving from a different route — and a warning appears if any day would end up with no stops at all.
- Apply saves the proposal and then re-runs Google Maps stop ordering on every route it touched. Cancel discards it — no routes are created, moved, or emptied.
- While a preview is open the Auto-Assign, Rebalance, and Optimize All buttons are disabled, so a second run can never land on top of one you are still reading.
Because Auto-Assign and Rebalance are gated behind Apply, they have no Undo — cancelling the preview is the undo. Undo covers the changes you make by hand: assigning, moving, and removing stops.
You can work directly on the map instead of the left panel:
- Click a gray (unassigned) pin to see the job, customer, address, and minutes at the stop, with an Assign… button that opens the same technician + day picker.
- Click a colored (assigned) pin for the same details plus Move… (send the stop to a different technician or day) and Remove from route (send it back to Unassigned).
- Lasso in the map toolbar turns on selection drawing — drag a shape around a cluster of gray pins and every unassigned stop inside it is selected. The matching cards tick in the Unassigned tab, and a N selected chip appears on the map with Assign…. Press Esc (or click Lasso again) to leave lasso mode; Esc with lasso off clears the selection.
- With a selection active, clicking a gray pin adds or removes that single stop. Selected pins are ringed in indigo. Shift-click or Cmd/Ctrl-click a gray pin to start a selection when none exists.
- Filtering the map to one technician or one day draws each route as a line in that day's color, home base → stops → home base. Dotted lines are straight-line estimates; a solid line means real driving directions were already calculated for that route (from Optimize or the Route Map) and could be reused. The builder never calls Google for new directions on its own.
The Routes tab lists one collapsible section per technician, and it follows each technician's work schedule — days a tech doesn't work don't get day slots. Collapsed technicians show a coloured dot per work day with that day's stop count, and Expand all / Collapse all opens or closes the whole crew; whichever technicians you leave open are remembered next time. Dragging a stop over a technician's name opens that technician mid-drag. Click the pencil icon next to a technician's name to open their Work Schedule dialog:
- Toggle each day of the week on or off and set start and end times per day — or apply the Mon-Fri 8-5 preset in one click.
- If you disable a day that has an active route with jobs on it, an "Active routes on removed days" warning appears with a "Transfer to..." picker — choose another technician (and one of their working days) to move the route to, or save without transferring, in which case the route remains but no longer shows in the builder.
- Every stop card in a day slot carries its stop number, a Frequency button that opens the job's schedule, a Move button that sends that one stop to another technician or day, a link out to the job page, and × to put it back in Unassigned. Cards on an Unassigned route have no Frequency button — a frequency edit needs a real technician on the route — but they can still be moved.
- Quarterly, semiannual, and annual jobs are not laid out in the builder — day slots show a count of these hidden long-cycle jobs, which are managed from the job page instead (see below).
- If a technician is archived, their routes stay but lose their owner. Those routes appear at the top of the Routes tab under Unassigned routes — click Assign on one to hand the whole route to another technician, or drag its stops onto someone's day. They also show up on the map under the Unassigned technician filter.
Create and manage individual routes
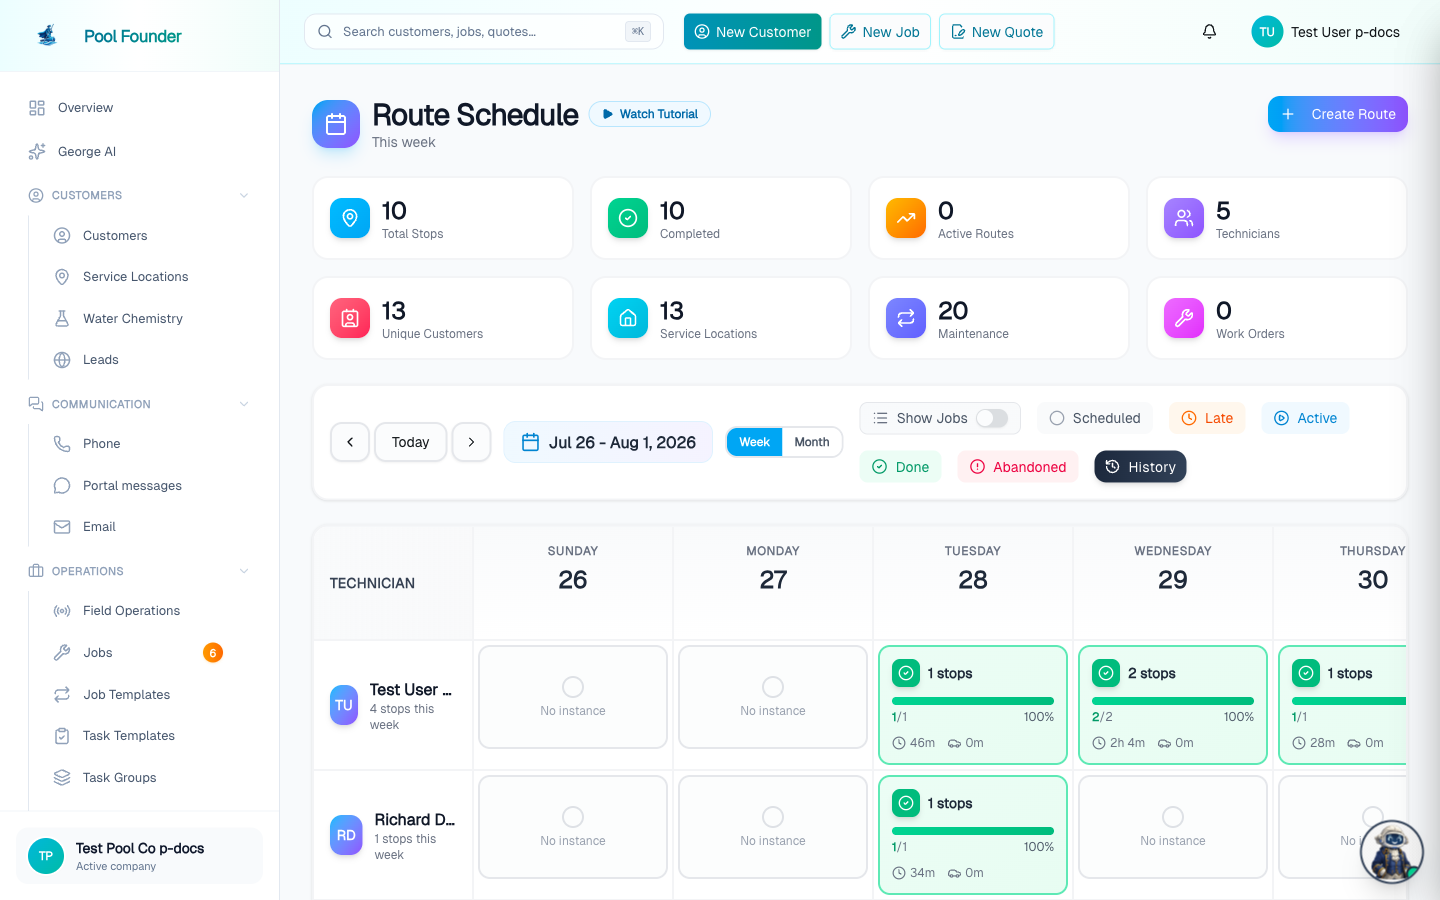
The Route Schedule page is where you plan and view routes by day and technician, and where individual routes are created with the Create Route button. Open a route to manage its jobs, and see transfer and move jobs for moving work between technicians and days.
Every schedule change — transfers, adds, removals, frequency changes, skips, reorders — is logged with who made it and why. History buttons on the Route Schedule, the Route Builder, and each route page open the audit log, and the office can also start, complete, or intervene in live routes. See admin route tools.
Single-day vs. recurring edits on a route page
Every route page has a two-button mode toggle at the top that controls what your edits affect — it's the most important control on the page:
| Mode | What edits affect |
|---|---|
| The dated day card ("Single day only") | Changes apply to that specific date only — one-time adds, skips, and reorders for the day. The recurring schedule is untouched. A prominent banner confirms: "Editing {date} Only." |
| Recurring Schedule ("All future weeks") | Changes apply to all future occurrences of the route — permanent adds, removals, and frequency changes. The banner reads "Editing Recurring Schedule." |
If a change you expected to stick disappeared the next week, it was probably made in single-day mode. Check the banner before you edit.
Where one-time stops and booked work orders sit in a day
- On a date with one-time additions and no order set by hand for that day, the day view lists those additions after the regular stops, in the same order the technician's app runs them.
- A work order booked at a spot in the day (from the Schedule dialog on Work orders to schedule, or from Best fit or Best days on its Schedule page) goes right after the stop it was booked after, or first. It remembers only that stop, not a copy of the whole day.
- So when the recurring route is later reordered or optimized, or customers are added to or removed from it, that date follows the new route order and the work order stays right after its stop.
- If the stop it follows is skipped, transferred, or removed that day, the work order moves to the end of the day.
- If that specific date was already reordered by hand, the hand order is kept and the work order is slotted in after the chosen stop.
- Rescheduling, completing, or removing the work order clears its spot.
Add a job to a route — even one that doesn't exist yet
A route's Add button opens the Add Jobs to Route screen — a searchable list you can multi-select from like a cart. Click jobs to stage them, configure each one, then commit the batch with Add All to Route (or Clear Selection to start over). Each staged maintenance job gets its own controls:
- This Day vs. Recurring — when you opened the screen from a specific date, each maintenance job can be added as a one-time visit for just that day or onto the recurring schedule.
- Frequency — recurring adds pick from Weekly, Every 2 Wks, Every 4 Wks, Every 13 Wks, Every 26 Wks, or Every 52 Wks; non-weekly frequencies also ask you to select the first date.
- Work orders simply confirm the date they'll be scheduled for.
If no jobs are available to add, a Create a Job button opens a quick-create dialog: pick the service location, keep or edit the auto-filled name, and optionally set a rate. It also supports Quick add contact for brand-new customers. The new job is staged onto the route automatically.
If the only jobs available are archived, the empty state on the Add Job to Route screen warns you and links to restore them. See pause, skip, and archive jobs.
Scheduling frequencies
- Weekly — the standard cadence for pool service.
- Biweekly (every 2 weeks) and monthly (every 4 weeks) — for less frequent service.
- Quarterly (every 13 weeks), semiannually (every 26 weeks), and annually (every 52 weeks) — for filter cleans, salt cell service, and other long-cycle visits. These jobs aren't laid out in the Route Builder — schedule them from the job page (see the next section) or the Add Jobs to Route screen, and they drop onto the route only in the weeks they occur.
- Multiple visits per week — pools serviced more than once a week are supported; when applying a job template in bulk you can set visits per week (1–5×) per pool.
Schedule a single job from its page
Every job page has a Route & Schedule card. Its Add to Route button (labeled Schedule on work orders) opens the Job Schedule page — a calendar-based scheduler for that one job: pick a technician, pick days or dates on the calendar, and set the frequency (Weekly through Every 52 Weeks). Multi-visit jobs prompt you to select the right number of days per week, and on maintenance jobs Recommended Tech + Day proposes the best route days. The same page powers rescheduling, transfers (with a This visit / Permanently toggle), and reopening completed work orders.
On a maintenance job, and on the Schedule Quote Walkthrough page for a lead, each calendar day shows the selected technician's stop count and day length for that exact date, like 12 stops · 6h 30m. It counts everything booked that date: the regular stops due that week, work orders and other one-time stops, and stops transferred in, minus stops skipped or transferred away. The estimated end time in the Schedule Summary uses that same day length, and a work order's Schedule page shows the same stop count and day length for the date. Two things still look only at the route's regular stops: the mi away distance on each day measures to the nearest recurring stop, and the recommendations above the calendar rank routes by their weekly stops, ignoring one-time bookings.
On a work order, the page shows Best fit instead: the technician and day that add the least driving across all your technicians, with a Use this button. Under it, Best days for the selected technician ranks their best days, and the calendar marks the same days with their number. A day picked from either one is booked at its spot in the route, not at the end. See Work orders to schedule for how days are picked.
The Route & Schedule card also shows Suggested Routes — candidate routes for the job, each showing the technician, day, the miles and minutes the stop would add, and the route's total time, with a one-click Add button that drops the job straight onto that route.
Watch routes on the map
The Route Map page plots every stop on a single map, color-coded by day. By default it shows the recurring weekly layout, filterable by day, technician, and route; the View Specific Date button switches to an exact calendar date instead, showing what actually runs that day. A stats sidebar summarizes Total Stops, Active Routes, Technicians, and Unassigned jobs, plus a per-day distribution of stops.
Field Operations is the real-time counterpart — a live map of active routes, technician locations, and job status while the day is running, with admin controls to skip stops or force-complete routes. See admin route tools. For what the technician sees on their phone, see run your route.
Frequently asked questions
How does route optimization order the stops?
Optimization is based on location and drive time, using Google Maps. It also prefers stopping on the same side of the street as each pool where possible, so the technician is not crossing traffic or U-turning at every other house. Traffic is factored in, so the order can differ depending on the time of day you optimize. Each day slot in the Route Builder has its own Optimize button, and Optimize All in the header runs every route that needs it at once.
Can I re-run optimization on a route I already optimized?
Yes. The green "Optimized" button on a day slot stays clickable, so you can re-run it whenever you want. You usually do not have to hunt for it: adding, removing, moving, or hand-reordering a stop marks that route "Changed since optimized" with a Re-optimize button, and Optimize All picks up exactly those routes.
Does optimizing a route move the work orders already booked on it?
A work order booked at a spot in the day stays right after the stop it was booked after. It remembers only that stop, not the whole day's order, so after you reorder or optimize the recurring route, or add or remove customers, the date follows the new order with the work order behind its stop. If that stop is skipped, transferred, or removed that day, the work order goes to the end of the day, and a date reordered by hand keeps its hand order.
Does Auto-Assign change my routes straight away?
No. Auto-Assign and Rebalance both build a proposal and show it as a preview first — proposed routes drawn as dashed lines on the map, plus a per-technician-and-day list of stops before → after with estimated time and miles. Nothing is written until you click Apply, and Cancel discards the whole proposal without creating, moving, or emptying a single route.
How do I undo a change in the Route Builder?
Assigning, moving, or removing a stop raises a toast that names the change with an Undo button — for example "Moved Smith to Bob · Thu". Undo reverses that exact change: an assign is taken back off the route, a move goes back to its old route at its old position, and a removal is put back where it was. It is one level deep, so the next change you make replaces it. Auto-Assign and Rebalance have no Undo because they are gated behind a preview — cancel the preview instead.
What does dropping a stop on a technician name do?
It puts the stop on that technician's best day, at the best position within that day. The builder measures which insertion adds the least driving (straight-line distance from the technician's home base through the day's stops), honours the job's preferred days when it has any, and breaks close calls in favour of the lighter day. Dropping on a day header does the same thing for that one day. The drag label shows the result before you let go, and a stop can never land on a day where that job already has a visit.
Can I assign several unassigned jobs at once?
Yes, two ways. In the Unassigned Jobs panel, tick the checkbox on each card (Shift-click selects a range, or use Select all visible). Or on the map, turn on Lasso and draw around a cluster of gray pins — every unassigned stop inside the shape joins the same selection. Either way, click "Assign N jobs…" and choose one technician and day for the whole selection. Two visits of the same multi-visit job cannot go on the same day, so that selection is blocked.
Can I assign or move a stop straight from the map?
Yes. Click a gray pin for job details and an Assign… button, or a colored pin for Move… and Remove from route. Move… opens the same technician + day picker and relocates the stop rather than adding a second copy — the day it already sits on is greyed out.
Why are some route lines dotted and some solid?
Dotted lines are straight-line estimates between stops, drawn instantly and free. A solid line means real driving directions for that exact route and stop order were already calculated (by Optimize or by opening the Route Map) and were still cached, so the builder could reuse them. The Route Builder never requests new directions from Google just to draw a line, so a route you've never optimized stays dotted.
Does optimization need the technician to have a home address?
No. Optimization anchors on the route's start and end location if you've set one, then the technician's address if their employee profile has one, and otherwise on the route's current first stop. Filling in a technician's address (or the route's start/end location) makes the ordering more accurate, because the drive from home and back is counted, but it is not required.
Is there a limit on how many stops a route can optimize?
No practical limit. Google optimizes 25 stops per request, so longer routes are optimized in chained segments — a 40-stop route is split into consecutive chunks that are each ordered for shortest drive time, with the linking stop shared between them.
Why are there no jobs to add to my route?
Either every job is already assigned, or the only remaining jobs are archived — the Add Job to Route screen warns you when that's the case and links to restore them. You can also create a new job on the spot with the Create a Job quick-create dialog.
Can a pool be serviced more than once a week?
Yes — multi-visit-per-week scheduling is supported, alongside weekly, biweekly, monthly, quarterly, semiannual, and annual frequencies.
Why don't my quarterly filter cleans show in the Route Builder?
The builder lays out weekly, biweekly, and monthly jobs; quarterly, semiannual, and annual jobs are hidden there (day slots show a count of them). Schedule those from the job page's Add to Route button or the Add Jobs to Route screen — they appear on the route only in the weeks they occur.
What decides whether a route edit is permanent?
The mode toggle at the top of the route page. The dated day card ("Single day only") makes edits that affect only that date; Recurring Schedule ("All future weeks") makes permanent changes. A banner always states which mode you're editing in.