The guided setup flow
Brand-new accounts land directly in a guided setup flow built for moving an existing book of business over: team → jobs → your book → routes. "Your book" is where customers, pool locations, and service jobs come in together. Until your first route is on the map, setup is the dashboard — the rest of it unlocks automatically the moment that route exists.
- Setup takes 15–30 minutes and is best done on a laptop.
- Everything saves as you go, and each step has its own URL — including each question in the job-template questionnaire — so reloading the page keeps your place (answers in the questionnaire are kept for the tab until you create the template).
- You never have to invent a "job name" anywhere in the flow — names are auto-filled from the customer and can be edited later.
- There's no close button or skip — the flow runs straight through the four steps, and the dashboard unlocks the moment your first route is built.
- Setup runs in its own focused screen: no sidebar, with your progress through the four steps shown in the top bar (each pill is clickable to jump between steps) alongside a Free setup call link. The full dashboard (and its sidebar) appears the moment your first route is built.
- Signup itself asks only for a mobile number or an email address, and you may be asked to confirm it with a 6-digit code. A verified phone or email is what unlocks sending invoices and quotes, texting customers, taking payments, and inviting teammates — see verify your phone or email.
Step 1: Your team
The "Who runs your routes?" step sets up whoever will be in the field. It opens with a "Do you run routes yourself?" Yes/No toggle. On Yes, you pick your own route days — the days you run routes — plus an optional home address that anchors them (auto-assign and drive times build around where you start your day). On No, the day picker and address field disappear and no schedule is saved for you.
- Solo operators: the "Add teammates" card is collapsed — just confirm your days and click It's just me — continue.
- Crews: click Add teammates to reveal the form. Name and email are required — the technician-app invite goes to that email. Phone, hourly rate, work days & hours, and address are optional. Adding technicians scales your plan automatically — see plans and your subscription.
- Save & add another keeps the form open so you can enter your whole team in one pass.
Step 2: Jobs — your service templates
The jobs step is where you define a service template for each type of service you offer, through a short question-at-a-time wizard: how you charge for service (Monthly flat rate, Per visit, or Outside PoolFounder), when invoices should go out, how you charge for chemicals (included in your rate, billed separately, or set amounts included), and the task checklist your techs follow (with one-click access to Corey's weekly checklist — the real 10-task list Pool Founder's co-founder runs on his own routes). The template name is pre-filled (e.g. "Monthly pool service") and editable. Per-pool rates are set later when you assign service to each pool.
On a phone, the first question also offers a one-tap Start with the standard card: it creates a "Weekly pool service" template — billed monthly on the 1st, chemicals billed separately, Corey's checklist attached — and moves straight on to Your book. Everything it picks can be changed later under Job Templates.
- Once at least one template exists, the step lists your templates with an Add another service template button, and Continue moves on to Your book.
- Templates are what the spreadsheet import and manual add use to create recurring jobs in one pass — build them before you bring customers in.
- The full template editor (rates, recurring charges, seasonal pricing, service terms) is always available later under Job Templates.
Step 3: Your book — customers, pools, and jobs
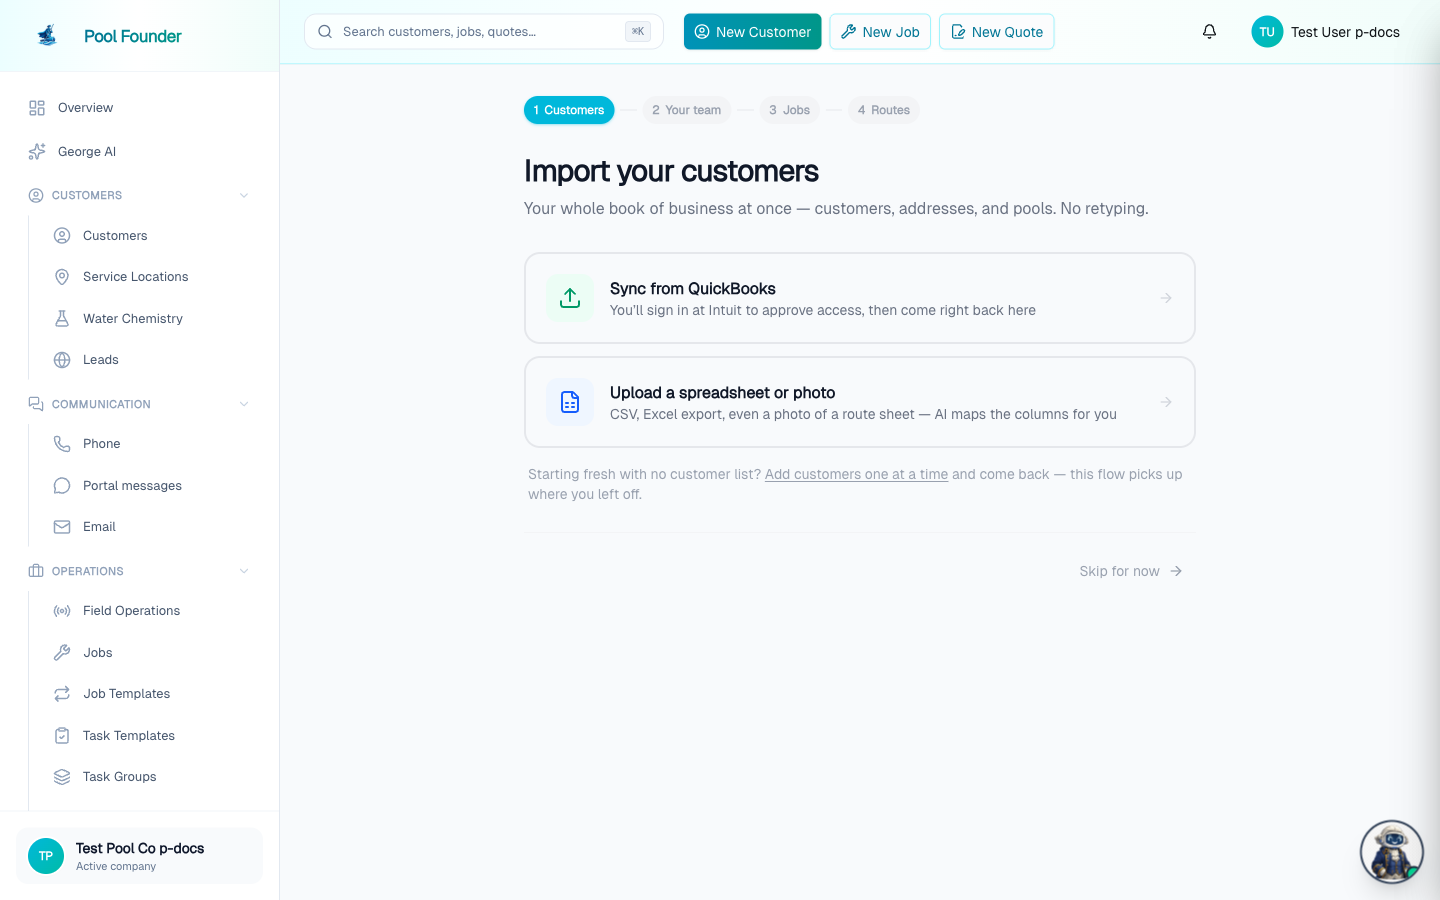
This step fills your book of business. A spreadsheet isn't just a customer list — one import creates customers, service locations, and recurring service jobs together so onboarding stays short:
- Add by hand — name, service address, and service defaults (template, day, tech). Each save creates the customer, pool, and job; the form stays put for rapid back-to-back adds.
- Sync from QuickBooks — approve the connection at Intuit, come right back, and pick which customers to bring over (locations only; you assign service next).
- Upload a spreadsheet or photo — the import wizard maps columns, then you assign template / day / tech / rate per row (or bulk-fill). Customers, pools, and jobs import in one pass. See Import your customers.
- Not sure which path fits? On a computer, open George AI from the sidebar (or the floating George bubble in the corner) and ask questions like what your spreadsheet should include. There is no separate Ask George card on the Overview page. (During phone setup the floating chat bubble is hidden to keep the screens light.)
Pools that still need a service after import (or after QuickBooks) get a follow-up phase inside this same step — Add Service in Bulk — so you can finish jobs without leaving Your book. Files that only have addresses still work: each pool imports as a customer named after its address.
Step 4: Routes
The "Build your routes" step embeds the real Route Builder. Hit Auto-Assign and Pool Founder clusters every job by location and places it onto your team's work days — then drag stops between routes until the week looks right. Everything saves as you go, and Continue unlocks once at least one route has stops. You can fine-tune everything afterwards too — see Build and optimize routes.
On a phone, this step is a single Auto-build my routes button instead of the drag-and-drop builder. One tap runs the same auto-assign, then shows each day's route with its stop count on a map. Any stops that couldn't be placed automatically are called out so you can slot them in later from the Route Builder on a computer.
The finale: your week on the map
Finish the routes step and setup ends with a little celebration — confetti falls over a "Your week is on the map!" screen showing your route count, your stops per week, and the week-view map exactly as your techs will see it on their phones. Two buttons close it out:
- Take me to my dashboard — heads to the Overview page to start running the business.
- Fine-tune in the Route Builder — opens the Route Builder to keep polishing the week (shown on computers).
On a phone, the lead button is Get the app — your routes are ready instead: it opens the technician app's store listing so you can install it and see the week you just built as real, navigable routes.
After your first route: the "Finish setting up" card
Once a route exists, the full dashboard unlocks. If setup isn't finished, the Overview page shows a compact Finish setting up card listing only the remaining steps — for example connecting Stripe for payments, or finishing your schedule and technicians.
Setting up from a phone
Setup works end to end on a phone. The wizard adapts: on the Your book step, Add by hand leads (spreadsheet and QuickBooks imports are marked "Works best on a computer" but still available), and the routes step becomes the one-tap Auto-build my routes button described above. Bulk imports really are easier with a keyboard, so a few bridges to a bigger screen are built in:
- If you signed up on a phone and your account has an email (phone signups are asked for one — optional — right after verifying their number), Pool Founder automatically emails you a desktop setup link (subject "Your Pool Founder setup link") about 30 minutes in — unless you've already finished setup by then.
- The team step has a Prefer a big screen? Email me a desktop setup link link that sends the same email on demand. If your account has no email yet, tapping it asks for one first and saves it to your account.
- The Your book step has the same slim email-me-a-link line, and after setup the dashboard Overview shows a "Looks like you're on your phone" card with Email me a setup link and Get the technician app buttons.
Opening the emailed link on a computer drops you back into setup exactly where you left off — progress saves continuously and syncs across devices.
Frequently asked questions
Can I leave setup and come back later?
Yes. Everything saves as you go, and each step has its own URL, so reloading the page, signing out, or coming back another day keeps your place. The rest of the dashboard just stays locked until your first route is built.
Can I skip setup and explore the dashboard first?
No. On new accounts the dashboard unlocks once your first route is on the map — that's the point where Pool Founder can actually run your day. There is no skip control on any step. If you get stuck, ask George or book a free setup call.
Do I have to name every job?
No. Job names are auto-filled from the customer — you never have to invent one during setup, and names can be edited later.
What if I want to explore before importing anything?
Add one or two customers by hand on the Your book step and build a quick route — that unlocks the dashboard. The rest of your book can come in any time from the Import Wizard, and Add Service in Bulk fills any gaps.
Can someone walk me through setup?
Yes — trial companies can book a free setup call with a co-founder. See Book a setup call for how it works.