Your team, in four pages
The Team section of the dashboard has four pages: Employees (your technicians and staff, their roles and schedules), Time Tracking (hours and clock-in/out records), Payroll (payroll summaries built from tracked time), and Vehicles (company vehicles, assignments, and mileage).
Technicians don't punch a clock. Clock-in/out and mileage are recorded automatically by the mobile app as they run their routes — and it works offline, syncing when they're back online.
Adding a teammate emails them an invite under your company name, so it requires a verified phone number or email on the owner's account — see verify your phone or email.
Add an employee
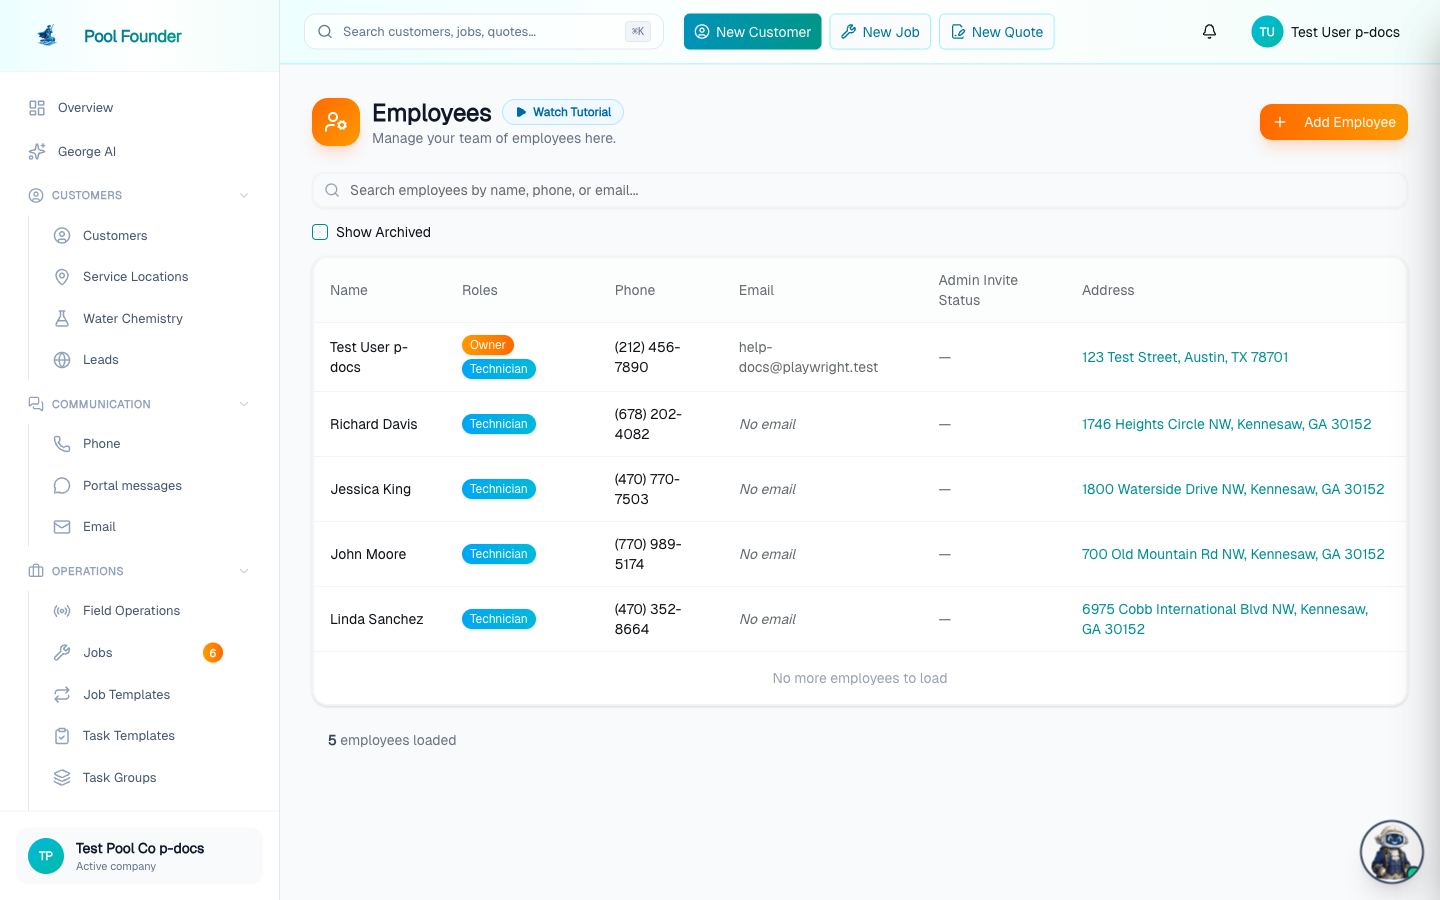
- 1Open Employees and click Add Employee.
- 2Fill in their name, phone, email, address, hourly rate, role, and work schedule (the default is 08:00–17:00).
- 3If none of the existing roles fit, create one first on the Roles page — see Roles and permissions.
During the guided get-started flow, the "Your team" step is another way to add teammates: name and email are required (the technician-app invite goes to the email), while phone, hourly rate, work days & hours, and address are optional. "Save & add another" keeps the form open for the next teammate. See the quick start guide.
Admin invites: send, resend, and track status
Giving a teammate the Administrator role (with an email on file) emails them an invite to the web dashboard automatically. The Admin Invite Status column on the Employees page tracks where that invite stands — it only shows for admin logins; owners and plain technicians show a dash.
- Accepted — they've set up their login and can sign in.
- Pending — the invite email is sent and waiting to be accepted.
- Expired — the invite link timed out before they used it.
- Not Sent — no invite has gone out yet.
If an invite is Expired, Pending, or Not Sent, a Resend button (or Send invite, when none has ever been sent) appears right next to the status in that column — click it to email a fresh invite. Like adding a teammate, sending an invite requires a verified phone or email on the owner's account (see verify your phone or email).
What adding a technician does to your plan
Pricing scales with your team automatically (see plans and your subscription) — there is no upgrade dialog and no limit to manage below 10 technicians:
- If adding a technician crosses into a bigger tier, the Add/Edit Employee form shows a notice with the new plan and price before you save — e.g. "Adding this technician updates your plan to Growth — $179/mo, prorated automatically."
- On a trial, the notice explains the plan tracks your team for free until you upgrade to paid.
- Removing or archiving technicians scales the plan back down the same way, with the proration credited automatically.
- Past 10 technicians (the largest self-serve tier), adding another opens a "Time to talk Enterprise" dialog with a Book a call button — Enterprise pricing is custom.
Archiving an employee (and what it changes)
The Archive button on an employee's page opens an impact dialog — "Archive {name}?" — that spells out what happens before you commit:
- It lists how many routes will be unassigned, by name (or notes "This employee is not assigned to any routes.").
- Each of their routes keeps its day and all its stops, but loses its technician and is renamed "Unassigned - {Day}" (e.g. "Unassigned - Monday") until you assign someone else.
- You must type the employee's name to enable the Archive Employee button.
- Archived employees are hidden everywhere until unarchived — tick Show Archived on the Employees page to find them, then click Unarchive on their page.
- The company owner cannot be archived.
Archiving deletes the employee's role assignments, and unarchiving does NOT restore them. After you unarchive someone, re-assign their role — until you do, they have no role permissions.
Time tracking and mileage
- Clock-in/out and mileage are tracked automatically by the technician mobile app — no manual timesheets.
- The Time Tracking page shows hours and clock-in/out records for the team.
- Miles per route come from the odometer, GPS, or an estimate.
- The mobile app works offline and syncs the records when the phone is back online.
Payroll and labor costs
The Payroll page builds payroll summaries from the tracked time. Pick the period with the selector at the top — Current Pay Week, Last Pay Week, or Bi-Weekly (Last 2 Weeks) — and the table shows each employee's rate, regular hours, overtime hours, total hours, miles, mileage reimbursement, and gross pay, with a totals row at the bottom.
The Settings popover (top right) holds the company-wide payroll settings:
- Mileage Rate ($/mile) — what you reimburse per mile driven (defaults to $0.70).
- OT Threshold (hours/week) — hours per week before overtime kicks in (defaults to 40).
- OT Multiplier — the overtime pay rate, e.g. 1.5 for time-and-a-half.
- Work Week Starts On — which day your pay week begins; the pay-period selector follows it.
- Labor Burden (%) — payroll taxes, workers' comp, and similar costs, added on top of wages in profitability labor costs (typical: 12–18%).
- Monthly Overhead ($) — fixed costs (insurance, software, rent), shown as an overhead line on the Profitability page for true net profit.
Export CSV downloads the period as a spreadsheet — Employee Name, Pay Rate, Regular Hours, Overtime Hours, Total Hours, Miles Driven, Mileage Reimbursement, and Gross Pay — ready to key into your payroll provider like ADP or Gusto. Pool Founder builds the summaries; it does not process payroll or handle tax withholding.
After changing the labor burden %, hourly rates, or odometer readings, use the "Recalculate" button on the Profitability page to recompute all profitability data. See profitability analytics for how labor and mileage feed your margins.
Vehicles and driving cost
The Vehicles page tracks company vehicles, their assignments, and mileage. Each vehicle's cost settings decide how driving cost is calculated in profitability analytics:
- Cost per Mile ($) — an all-in rate covering fuel, wear, and depreciation. If set, it overrides everything else.
- MPG — if you only enter MPG, the system computes a fuel-only cost from weekly regional gas prices.
- Both set — the mileage cost splits into Fuel (miles × gas price ÷ MPG) and Vehicle wear & depreciation (the rest of the all-in rate), shown in the Total Costs tooltip and on route detail pages — so you can see actual gas spend separately from wear.
Technicians can also add a vehicle from the field: the mobile app's Route tab actions list has an "Add Vehicle" row under the Create heading.
The vehicle detail page
Click a vehicle on the Vehicles page to open its detail page:
- Three mileage stat cards — Total Miles, This Month, and This Week — computed from odometer readings.
- A Vehicle Information card (color, license plate, VIN, current odometer, last odometer update, MPG, notes) and an Assigned Employees card, where the default assignment carries a "Default" badge.
- A Mileage History table listing every route run and logged trip: date, type (a Route badge, or the trip's purpose), employee, start and end odometer, miles, and photos.
- Odometer photos taken by technicians show as thumbnails — click one to view it full screen.
- Team members with mileage-management permission see an edit button on each row that opens the Edit Odometer dialog — fix the Start Odometer or End Odometer reading, with a live miles preview that blocks saving if the end reading is below the start.
After correcting odometer readings, use Recalculate on the Profitability page (or the per-run Recalculate on that route run's detail page) so mileage costs pick up the fix.
Frequently asked questions
Do technicians have to clock in and out manually?
No — clock-in/out and mileage are recorded automatically by the mobile app while they run their route, even offline (records sync when the phone reconnects). The records show up on the Time Tracking page.
How are miles per route calculated?
From the odometer, GPS, or an estimate. If a completed visit is missing labor time or mileage data, the Profitability page flags it so you know the numbers are incomplete.
Should I enter Cost per Mile or MPG on a vehicle?
Enter an all-in Cost per Mile if you know it — it overrides everything and captures fuel plus wear and depreciation. If you only enter MPG, the system computes a fuel-only cost from weekly regional gas prices. With both set, the cost splits into Fuel and Vehicle wear & depreciation so you can see each separately.
Where do I set what an employee is allowed to do?
Each employee is assigned a role, and roles carry granular permissions. Manage them on the Roles & Permissions page — see the Roles and permissions article.
I unarchived an employee but they have no permissions — why?
Archiving an employee deletes their role assignments, and unarchiving does not restore them. Re-assign their role after unarchiving and their access comes back.
An admin's invite expired. How do I resend it?
On the Employees page, find the person in the list and look at the Admin Invite Status column. Whenever the status is Expired, Pending, or Not Sent, a Resend button (or "Send invite") appears right next to it — click it to email a fresh invite. Sending an invite requires a verified phone or email on the owner's account.